


Concealer. It’s meant to be the magic wand in our makeup bag—a tool to erase sleepless nights, hide unexpected blemishes, and create a bright, youthful lift. But for many, this supposed hero product is a source of daily frustration. Instead of concealing, it seems to highlight. Instead of brightening, it creates a dry, crepey texture. And most alarmingly, instead of making us look refreshed, it can subtly add years to our appearance.
If you’ve ever looked in the mirror midday and been horrified to see your concealer settled into every fine line, looking cakey, or creating a strange, unnatural patch under your eyes, you are not alone. The problem is rarely the concealer itself, but the technique used to apply it.
This guide will illuminate the five most common concealer mistakes that can inadvertently age your appearance. More importantly, we will provide you with the professional, step-by-step fixes to transform your technique, ensuring your concealer works for you, not against you, to create a smooth, bright, and truly flawless finish.
Mistake #1: Using a Single, Too-Light Shade for Everything
This is the most widespread concealer myth, born from old-school advice to use a shade “one or two shades lighter” for under the eyes. This leads to the dreaded “reverse raccoon” effect—two bright, obvious circles that draw attention to the exact area you’re trying to conceal.
Why It Ages You:
- Highlights Texture: A starkly light shade acts like a spotlight. Instead of concealing fine lines, wrinkles, and puffiness, it highlights their texture and dimension.
- Creates a Gray Cast: When a very light concealer is placed over dark, bluish, or purple under-eye circles without color correction, it doesn’t have enough pigment to neutralize the darkness. The result is a murky, ashy, or gray-looking patch that can look more hollow and tired than the original darkness.
- Looks Unnatural: It creates a clear demarcation between your under-eye area and the rest of your face, breaking the illusion of a seamless complexion.
The Pro Fix: The Two-Concealer Rule Professionals know that you need two different concealers in your arsenal for two different jobs: one for concealing and one for brightening.
- For Concealing Blemishes & Redness: You need a concealer that is an exact match to your foundation shade. Its job is to cover a spot and blend invisibly into the rest of your base. Using a light shade on a pimple will only put a spotlight on it.
- For Brightening Under the Eyes: Here, you should select a shade that is only half a shade to one full shade lighter than your skin tone. Crucially, you must also pay attention to the undertone.
- If your dark circles are bluish or purple, choose a brightening concealer with a peachy or pink undertone. Peach cancels out blue, and pink cancels out purple.
- If your dark circles are brownish, choose a brightening concealer with a golden or honey undertone.
As we detailed in our Foolproof Guide to Finding Your Foundation Shade, understanding undertone is the key to a truly perfect match.
[Image: A clear, side-by-side infographic. The left side is labeled “WRONG” and shows a hand with a foundation swatch and a much, much lighter concealer swatch next to it. The right side is labeled “RIGHT” and shows the same foundation swatch with two concealer swatches: one that is an exact match, and one that is just subtly lighter and peachier.]
Mistake #2: Choosing the Wrong Formula for the Job
Not all concealers are created equal. Using a thick, dry, matte concealer designed for covering blemishes on the delicate, mobile skin under your eyes is a recipe for disaster.
Why It Ages You:
- Causes Dehydration & Crepiness: The skin under our eyes is significantly thinner and has fewer oil glands than the rest of our face. A heavy, matte formula will suck the moisture out of this delicate area, creating a dry, crepey texture that mimics and exaggerates the look of aged skin.
- Settles into Fine Lines: Because dry formulas have less slip and flexibility, they are more prone to cracking and settling into every fine line and expression line as your face moves throughout the day.
The Pro Fix: Match the Formula to the Area
- For Under the Eyes: Always choose a hydrating, radiant, or satin-finish liquid concealer. These formulas are more flexible and move with the skin. Look for ingredients like Hyaluronic Acid, Glycerin, and Vitamin E. They provide coverage while adding a youthful, plumping layer of moisture.
- For Blemishes & Discoloration on the Face: This is where you use your full-coverage, long-wearing, soft-matte concealer. These formulas have a higher pigment load and are designed to “set” in place, providing opaque coverage that won’t budge for hours.
Mistake #3: Applying in a Large, Outdated Triangle
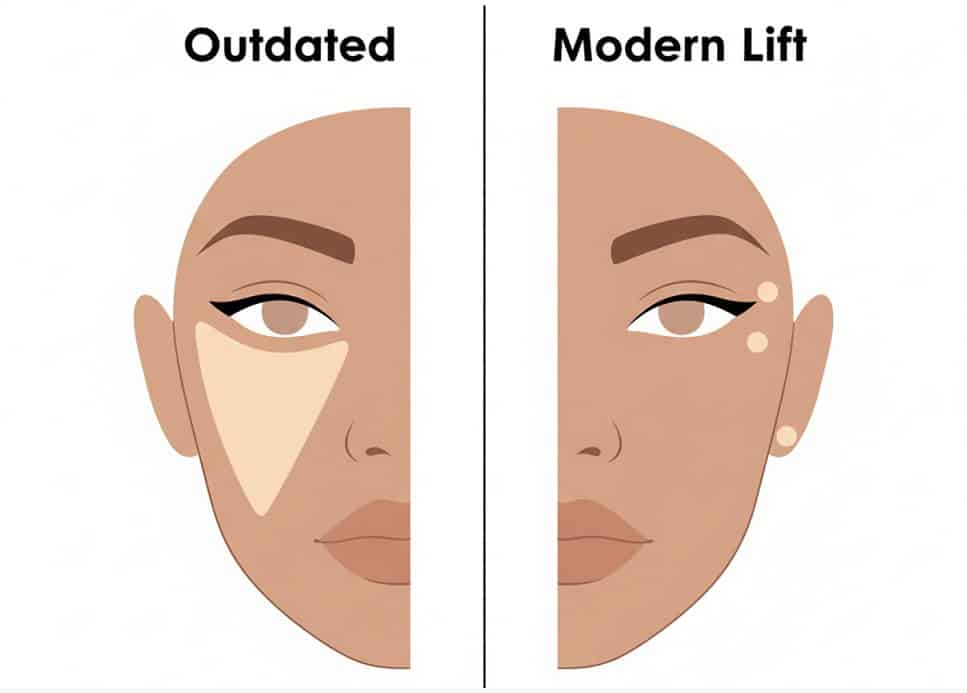
For years, beauty gurus advocated for drawing a large, inverted triangle of concealer under the eyes. While this provides a lot of brightness, it also involves applying a huge amount of product where you don’t need it, leading to a heavy, cakey look.
Why It Ages You:
- Looks Heavy & Mask-Like: A thick, opaque triangle of concealer rarely looks like real skin. It creates a heavy, overly “done” appearance.
- Increases the Chance of Creasing: More product equals more potential for creasing. The more concealer you apply, the more there is to settle into fine lines, especially on the outer corners of the eyes where we smile and squint.
The Pro Fix: Strategic Lifting Placement The modern, professional technique is about placing product only where it’s needed to create a lifted, brightened effect with minimal product.
- Inner Corner: Place a small dot of your brightening concealer in the very inner corner of your eye, right next to the bridge of your nose. This is often the darkest area and instantly brightens the entire eye.
- Outer Corner: Place another small dot or a tiny upward swipe at the outer corner of your eye, angled up towards your temple. This creates a powerful visual “lift” that makes the eye look more awake and youthful.
- Blend: Use a damp mini-sponge, a small fluffy brush, or your ring finger to gently tap and blend the product, connecting the two points if needed, but keeping the application focused. This provides brightness and lift without the weight.
Mistake #4: Applying Too Much Product at Once
When faced with very dark circles or a prominent blemish, our instinct is to pack on a thick layer of concealer in one go. This almost always backfires.
Why It Ages You:
- Creates “Cake Face”: A thick layer of concealer is difficult to blend seamlessly and sits on top of the skin, looking heavy and obvious.
- Highlights Texture: Instead of concealing a blemish, a thick blob of product can create a raised texture around it, making it look even more noticeable.
- Guarantees Creasing: A single, thick layer under the eyes has no flexibility and will immediately crease and settle.
The Pro Fix: Build in Thin, Targeted Layers The secret to full coverage that still looks like skin is building up the product in sheer layers.
- First Layer: Apply a very thin layer of concealer to the area.
- Blend: Gently blend out the edges, leaving the center of the area with the most coverage.
- Wait: Let that layer sit and “set” for 30-60 seconds. This allows it to become slightly tacky and build coverage.
- Assess: Look at the area. Is it covered enough? If not, proceed to the next step.
- Second Layer: Apply another very thin layer, concentrating it only on the very center of the darkness or blemish that is still peeking through. Tap gently to blend. This technique provides maximum opacity with minimal product.
Mistake #5: Forgetting to Prep and Set Correctly
Concealer is not a one-step product. It requires a support system: a prepared base to go onto and a proper setting technique to lock it in place.
Why It Ages You:
- Skipping Prep: Applying concealer to a dry, unprepared under-eye area will cause it to look crepey and settle into lines immediately.
- Setting with Too Much Powder: Using a heavy, opaque powder and “baking” the under-eye area can suck all the moisture out, creating a desert-like texture that adds ten years to your appearance. It creates a dry, heavy cast that cracks when you smile.
The Pro Fix: The Hydrate & Press Method
- Prep with Eye Cream: Before any makeup, apply a small amount of a lightweight, hydrating eye cream. Let it absorb fully for a few minutes. This creates a plump, smooth canvas for the concealer to glide over.
- Set with a Fine, Brightening Powder: After blending your concealer, choose a very finely milled, lightweight translucent or brightening (e.g., pale yellow or pink) setting powder.
- The “Press and Roll” Technique: Instead of sweeping the powder on with a brush (which can move the concealer), take a small amount on a powder puff or a damp sponge. Tap off the excess, look up to smooth out any initial creases, and gently press and roll the powder onto the under-eye area. This locks the concealer in place without adding texture or looking heavy. This is the ultimate technique to prevent creasing, which we explore further in our upcoming guide.
“Every great makeup look starts with a solid foundation routine. From primer to setting powder, each step works together to achieve a seamless complexion, which is the goal of a flawless base.”
Conclusion: Concealer as a Tool for Youthfulness, Not Age
Concealer is one of the most powerful tools in your makeup kit, but like any tool, its power lies in the skill of the user. By avoiding these five common mistakes—choosing the right shades and formulas, mastering a modern application technique, using the product sparingly, and perfecting your prep and set routine—you can finally unlock its true potential. It’s time to stop fighting with your concealer and start making it work for you, transforming it from a source of frustration into your most reliable secret weapon for a bright, lifted, and timelessly beautiful look.

