


In the vast and often-hyped world of skincare, few ingredients command as much respect and reverence as retinol. Dermatologists hail it as the undisputed “gold standard” for anti-aging. Beauty editors write endless odes to its transformative power. It’s the one ingredient that science has proven, time and time again, to visibly reduce fine lines, smooth texture, and improve skin tone.
Yet, for all its glory, retinol is also surrounded by an aura of fear. Whispers of “retinol uglies,” peeling skin, and intense irritation cause many to leave this powerhouse ingredient sitting on the shelf. Can you really achieve that coveted “retinol glow” without a painful, flaky initiation period?
The answer is a definitive yes. The key to success with retinol is not a high pain tolerance; it’s a smart, strategic, and patient approach. This is your complete beginner’s roadmap. We will demystify the science, guide you in choosing the right product, and provide a step-by-step method to introduce this ingredient into your routine safely, minimizing irritation and maximizing its incredible benefits.
Part 1: The Retinoid Family – Understanding What You’re Using
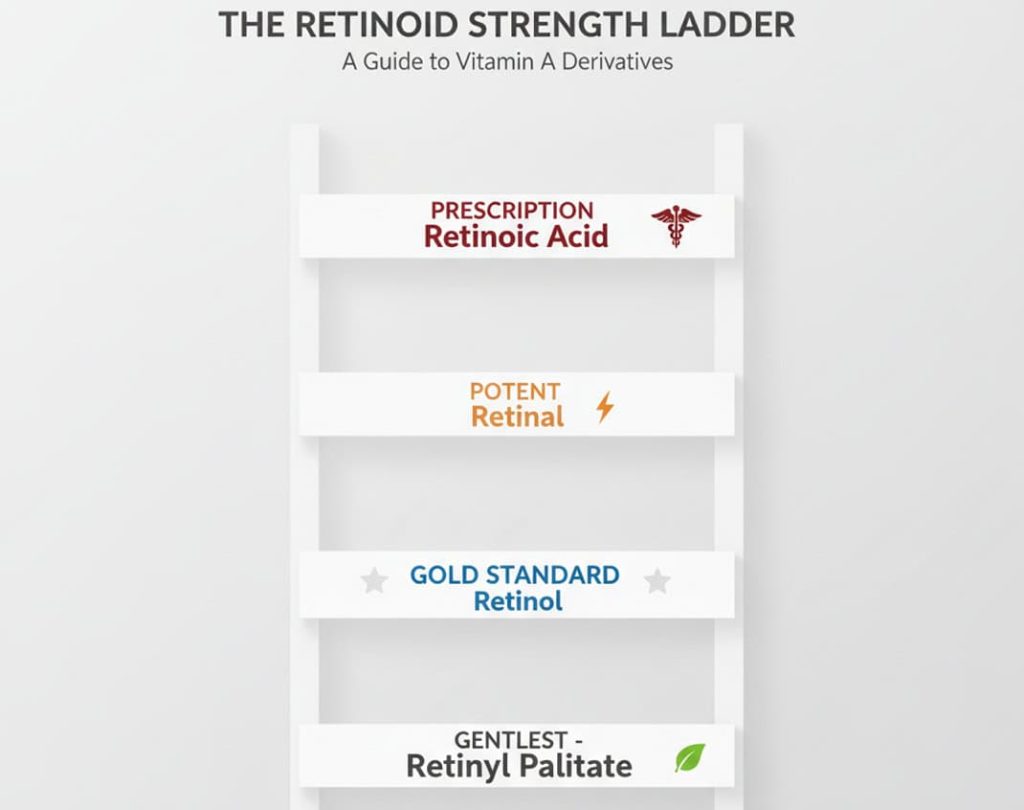
“Retinoid” is the umbrella term for a family of Vitamin A derivatives. Understanding this family tree is the first step to choosing the right product. Think of it as a ladder of potency: the more steps it takes for your skin to convert the ingredient into its active form (Retinoic Acid), the gentler it is.
- Retinoic Acid (Tretinoin): This is the top of the ladder. It is the pure, active form that your skin cells can use directly. It is extremely effective but also potentially very irritating. It is available by prescription only.
- Retinaldehyde (Retinal): This is one conversion step away from Retinoic Acid. It is the most potent retinoid you can get without a prescription and is known for working faster than retinol.
- Retinol: This is the most common over-the-counter retinoid. It is two conversion steps away from Retinoic Acid. It is the gold standard for beginners, offering a perfect balance of efficacy and tolerance.
- Retinyl Esters (e.g., Retinyl Palmitate): These are the gentlest members of the family, multiple conversion steps away from Retinoic Acid. They are great for extremely sensitive skin but offer the least dramatic results.
For a beginner, the clear choice is to start with a low-concentration RETINOL.
Part 2: The Science of Transformation – What Does Retinol Actually Do?
Retinol is a cell-communicating ingredient that works on a deep level to fundamentally change how your skin behaves.
- It Accelerates Cell Turnover: Its primary function is to bind to receptors in your skin cells and tell them to behave like younger, healthier cells. This dramatically speeds up the rate at which old, dead skin cells are shed and new, fresh cells are produced.
- The Result: A visible improvement in skin texture, a reduction in the appearance of post-acne marks, and a brighter, more radiant complexion.
- It Boosts Collagen Production: Retinol not only helps to preserve the collagen you have but also actively stimulates your fibroblast cells to produce new, healthy collagen and elastin.
- The Result: Firmer, plumper skin with a visible reduction in fine lines and wrinkles over time.
- It Unclogs Pores: By normalizing cell turnover within the pore lining, retinol helps to prevent dead skin cells from clumping together and forming clogs, which lead to blackheads and breakouts.
Part 3: Managing Expectations – The “Retinization” Period
This is the most critical concept for a beginner to understand. The initial period of irritation some people experience is not an allergic reaction; it’s a predictable adjustment phase known as retinization.
As retinol speeds up cell turnover, there can be a period of 4-6 weeks where your skin is shedding cells faster than it’s used to. During this time, you may experience:
- Dryness and Flakiness: Especially around the nose and mouth.
- Mild Redness and Irritation: A sign that your skin is adapting.
- A “Purge”: A temporary increase in breakouts as retinol pushes underlying congestion to the surface.
The key is that all of this can be significantly minimized, or even avoided entirely, by following a careful introductory protocol.
Part 4: The Beginner’s Roadmap – How to Start Retinol Without Irritation
This is your step-by-step guide to a successful retinoid journey.
Step 1: Choose Your Fighter – Start Low & Gentle
Select an over-the-counter retinol product with a low concentration, typically 0.2% to 0.3%. Many beginner formulas are also buffered with soothing ingredients like niacinamide or ceramides.
Step 2: The Non-Negotiable Patch Test
Before putting it on your face, apply a small amount to a discreet area (like behind your ear or on your inner arm) for three consecutive nights. If you experience severe itching, hives, or swelling, you may have a rare allergy. Mild redness or dryness is normal.
Step 3: The “Start Low, Go Slow” Schedule
This is the most important rule. You must allow your skin time to build up its tolerance.
- Weeks 1-2: Apply your retinol one night per week.
- Weeks 3-4: If your skin is handling it well, increase to two non-consecutive nights per week (e.g., Monday and Thursday).
- Weeks 5-6: Increase to three non-consecutive nights per week.
- The Goal: Slowly work your way up to every other night, or nightly, as your skin can tolerate. For many, 3-4 nights a week is the sweet spot for great results with zero irritation.
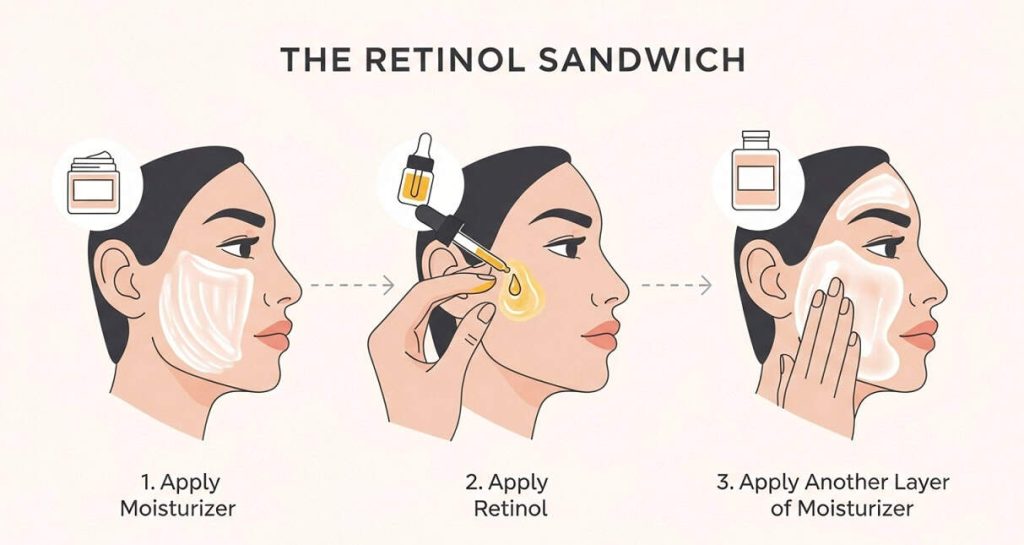
Step 4: Master the “Retinol Sandwich” Technique
This is the ultimate hack for sensitive or dry skin. It involves “buffering” the retinol between two layers of moisturizer to dilute its potency slightly and reduce dryness.
- Cleanse and gently pat your skin dry.
- Apply a thin layer of a simple, hydrating moisturizer to your entire face.
- Wait a few minutes for the moisturizer to absorb.
- Apply a pea-sized amount of your retinol. (More is not better!)
- Wait a few more minutes, then apply another thin layer of your moisturizer on top.
This technique is a fantastic way to incorporate supportive ingredients, a topic we explore in our Ingredient Deep Dive: Niacinamide, which is an excellent partner in a retinol routine.
Step 5: SPF is Your New Religion
Retinol makes your skin more photosensitive (vulnerable to sun damage). Using retinol without a daily, diligent sunscreen habit is not only counterproductive; it’s damaging.
- You must apply a broad-spectrum SPF 30 or higher every single morning, without fail. This is the most important rule of using retinoids. We break down the best non-greasy options in our Ultimate Guide to Face Sunscreens.
Part 5: The Rules of Engagement – What to AVOID When Using Retinol
To ensure a smooth journey, temporarily simplify the rest of your routine. On the nights you use retinol, avoid using these other actives in the same routine:
- Exfoliating Acids (AHAs/BHAs): Using them together can lead to over-exfoliation and a damaged skin barrier. Use them on your “off nights” from retinol. We explain these in our Chemical vs. Physical Exfoliants guide.
- Vitamin C: While they can be used together by seasoned users, beginners should separate them. Use your Vitamin C in the morning (where it works best anyway) and your retinol at night.
- Harsh Scrubs & Astringent Toners: Avoid any form of harsh physical exfoliation or drying, alcohol-based toners.
Pro Tip: A key treatment in your nighttime routine can make your morning makeup glide on effortlessly — and keep that truly flawless finish intact.
FAQ Section: Your Beginner Retinol Questions, Answered

- 1. How much retinol should I actually use?
- A pea-sized amount is enough for your entire face. Dot it on your forehead, cheeks, and chin, then gently massage it in. Using more will not get you faster results, it will only get you more irritation.
- 2. When will I actually see results?
- Retinol is a marathon, not a sprint. You may notice subtle improvements in texture and glow in 4-8 weeks, but for visible changes in fine lines and hyperpigmentation, you need to be consistent for at least 3-6 months.
- 3. Can I use retinol around my eyes and on my neck?
- Yes, but with extreme caution. The skin here is very thin. Avoid applying it directly to your eyelids. You can use what’s left on your fingertips to gently pat around the orbital bone. For the neck, start very slowly and always use the sandwich method. Alternatively, use a specifically formulated retinol eye cream or neck cream.
- 4. My skin is breaking out after starting retinol. Is this a “purge”?
- It could be. A purge typically happens in your usual breakout areas and consists of small, quick-to-heal pimples. It should subside within a few weeks. If you are getting deep, cystic acne in new areas, or if the breakout persists, it may be irritation.
- 5. Is retinol safe during pregnancy or breastfeeding?
- NO. This is a critical safety warning. Oral retinoids are known to cause birth defects, and while the risk from topical application is low, it is absolutely not worth it. All retinoids should be completely avoided during pregnancy and breastfeeding.
Conclusion: A Marathon, Not a Sprint
Starting your retinol journey is one of the most powerful investments you can make in the long-term health and appearance of your skin. The fear surrounding this gold-standard ingredient is born from a history of misuse, not from the ingredient itself. By treating it with respect, starting with a low concentration, introducing it slowly, and prioritizing your skin barrier with supportive techniques like the “retinol sandwich,” you can avoid the dreaded irritation. Be patient, be consistent, and get ready to witness the incredible, scientifically-proven transformation for yourself.

