


Few steps in a makeup routine hold as much transformative power as eyeliner. With a single, well-placed line, you can make your lashes appear fuller, your eyes look bigger and more defined, and your entire look feel more polished and intentional. Yet, for many, it remains the most intimidating step of all. The quest for a perfect, symmetrical wing or a softly smudged lash line often ends in frustration, cotton swabs, and the temptation to give up entirely.
Much of this struggle stems from a simple, yet crucial, mismatch: using the wrong type of eyeliner for your skill level or desired look. The worlds of a soft kohl pencil, a creamy gel pot, and an inky liquid pen are vastly different, each with its own unique strengths, weaknesses, and techniques.
This is your definitive guide to the world of eyeliner. We will dissect each formula, revealing who it’s for, what it does best, and the professional techniques required to master it. It’s time to demystify the liner aisle and empower you to finally choose the right tool to create your perfect line, every single time.
Part 1: The Eyeliner Arsenal – A Deep Dive into Each Formula
Understanding the core properties of each liner type is the key to unlocking your potential.
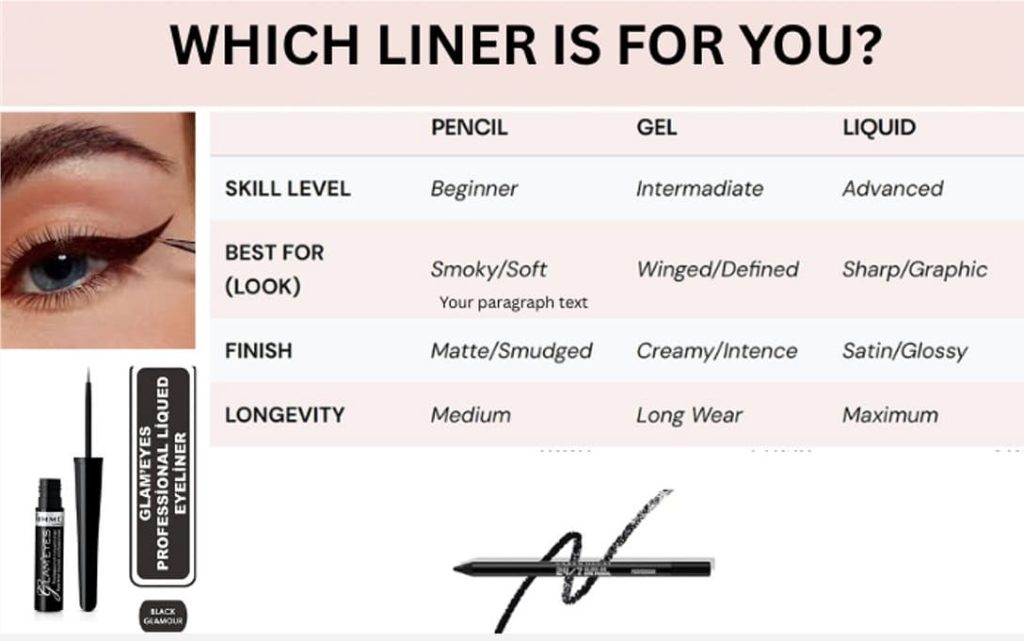
1. The Pencil Eyeliner: The Forgiving Foundation
This is the classic starting point for most people and remains a staple in every makeup artist’s kit for its versatility.
- What It Is: A solid pigment formula encased in a pencil. They come in two main forms:
- Kohl/Kajal Pencils: Very soft, creamy, and highly pigmented. Designed to be smudged and blended easily.
- Gel/Waterproof Pencils: A hybrid formula that glides on like a creamy gel but sets to a long-wearing, waterproof finish. Often comes in a retractable format.
- Best For:
- Absolute Beginners: The most forgiving and easiest to control.
- Smoky & Smudgy Looks: The blendable nature of kohl is perfect for a rock-and-roll smoky eye.
- Tightlining & Waterline: The soft texture is ideal for applying liner to the sensitive upper and lower waterlines.
- Pros and Cons:
| Pros | Cons |
| Extremely Beginner-Friendly: Easy to control. | Not Ideal for Sharp Wings: Too soft for crisp lines. |
| Versatile: Can be sharp or smudged. | Can Smudge Easily: Kohl formulas are prone to smudging. |
| Fast Application: Quick and easy for daily use. | Requires Sharpening: Traditional pencils need maintenance. |
| Great for the Waterline: Safe and comfortable. | Can Skip on Oily Lids: May not last on very oily lids. |
- Application Masterclass (The Soft Smudge):
- Gently pull your lid taut.
- Starting from the outer corner, sketch the pencil in short, connected dashes along your upper lash line, getting as close to the roots as possible.
- Take a small pencil brush or even a cotton swab and gently smudge the line to soften any harshness and create a diffused, smoky effect.
2. The Gel Eyeliner: The Professional’s Choice for Precision
Housed in a small pot and applied with a separate brush, gel liner is the secret to the intense, long-wearing lines seen in high-fashion looks.
- What It Is: A creamy, waxy, highly pigmented formula in a pot that provides a rich, matte, or satin finish.
- Best For:
- Creating a Classic Winged Liner: Offers the perfect combination of intense pigment and control.
- Long-Wear & Water-Resistance: Once it sets, it’s virtually bulletproof, making it ideal for long days or oily lids.
- Intermediate to Advanced Users: Requires a steady hand and comfort with using a brush.
- Pros and Cons:
| Pros | Cons |
| Intense Pigment & Opaque Coverage: Deep, rich color. | Requires a Separate Brush: Less portable, needs cleaning. |
| Incredible Longevity: Smudge-proof and waterproof. | Can Dry Out in the Pot: Requires careful sealing after use. |
| Ultimate Control: The brush allows for variable line thickness. | Steeper Learning Curve: Takes practice to master the brush. |
| Smooth Application: Glides on without skipping. | Harder to Correct: Less forgiving of mistakes once it sets. |
- Application Masterclass (The Classic Wing):
- Dip the very tip of a fine, angled eyeliner brush into the pot. Wipe off any excess on the rim.
- Looking down into a mirror, start by drawing the flick. Place the brush at your outer corner and draw a short line angled up towards the tail of your brow.
- Place the brush tip at the very end of your flick and draw a straight line back to the center of your lash line.
- Fill in the resulting outline. Then, use the brush to draw a thin line from the inner corner to connect with the center.
3. The Liquid Eyeliner: The Ultimate for Sharpness & Drama
Liquid liner is the go-to for creating crisp, graphic, and intensely black lines. It offers the sharpest finish possible.
- What It Is: A fluid, inky formula housed in a tube with a built-in applicator. They come in two main forms:
- Felt-Tip Pen: Like a marker. Easy to hold and control, making it great for beginners to liquid liner.
- Brush-Tip Pen: Like a fine paintbrush. Offers incredible precision and flexibility for creating delicate lines or dramatic wings, but requires more skill.
- Best For:
- Ultra-Sharp, Graphic Wings: Unbeatable for a clean, precise flick.
- Dramatic & Bold Looks: Delivers a high-impact finish (satin or glossy).
- Creating Fine, Delicate Lines: The fine tip allows for precise application.
- Pros and Cons:
| Pros | Cons |
| Crispest, Sharpest Lines Possible: Unmatched precision. | The Least Forgiving: Mistakes are very noticeable. |
| Intense Color Payoff: Often the blackest of blacks. | Can Flake or Crack: Some formulas can flake when dry. |
| Quick-Drying Formulas: Sets down quickly. | Can Drag on Textured Lids: May not apply smoothly. |
| Felt-Tip is Beginner-Friendly: Easy to hold. | Can Dry Out Quickly: Pens have a shorter shelf life. |
- Application Masterclass (The Connect-the-Dots Method):
- Anchor your elbow on a table for stability.
- Instead of trying to draw one continuous line, use the tip of the pen to place small dots along your lash line.
- Gently “connect the dots” using short, feathery strokes to create a smooth, even line.
- For the wing, follow the same “draw the flick, connect back, and fill” method as the gel liner.
Part 4: Pro-Level Tips for Any Eyeliner Type
- Anchor Your Arm: The number one cause of shaky lines is an unsteady hand. Rest the elbow of your drawing arm on a table or vanity for stability.
- Look Down into a Mirror: Place a mirror flat on a table and look down into it. This gives you a clear, unobstructed view of your lash line.
- Start Thin: You can always add more, but it’s much harder to take away. Always start with the thinnest line possible and build it up to your desired thickness.
- Let It Set: Especially with gel and liquid liners, keep your eyes slightly lowered for 30-60 seconds after application to prevent the liner from transferring into your crease while it dries.
FAQ Section: Your Eyeliner Problems, Solved

- 1. My eyeliner always smudges and transfers. How do I stop it?
- This is a common issue, especially for those with hooded eyes or oily lids. The solution is threefold: 1) Always use an eyeshadow primer first to create a non-oily base. 2) Switch to a long-wearing gel or waterproof liquid formula. 3) Set your pencil liner by lightly pressing a matching dark eyeshadow over top with an angled brush.
- 2. How do I get my wings to be symmetrical?
- Sisters, not twins! Don’t aim for perfect mirror images. A great trick is to draw the flicks on both eyes first, before drawing the rest of the line. This makes it much easier to adjust them to be as even as possible.
- 3. My eyeliner seems to make my eyes look smaller. What am I doing wrong?
- You are likely lining your entire eye, including your lower waterline, with a thick, dark line. This can close off the eye. Try keeping the liner only on your upper lash line, or if you line the bottom, keep it very soft and only on the outer third. Using a nude or white pencil on your lower waterline can actually make your eyes look bigger and brighter.
- 4. How do I remove stubborn waterproof eyeliner?
- You need an oil-based cleanser. The double cleansing method, using a cleansing oil or balm as your first step, is the most effective and gentle way to melt away waterproof makeup without harsh rubbing.
Conclusion: Find Your Formula, Practice Your Line
Eyeliner is a skill, and like any skill, it is perfected through practice. The first and most crucial step on that journey is choosing the right tool for the job. By understanding the unique properties of pencil, gel, and liquid eyeliners, you can select the formula that best suits your comfort level and creative vision. Stop fighting with a liner that doesn’t work for you. Find your perfect match, embrace the learning process, and get ready to master the art of the perfect line. Soon, you’ll be ready to experiment with the latest looks, like the ones we explore in our “Siren Eye” vs. “Doe Eye” trends guide.

