


You’ve followed the tutorial step-by-step. You’ve blended the perfect crease, applied a beautiful lid shade, and crafted a sharp eyeliner wing. You look down, and it’s a masterpiece. Then, you look straight ahead into the mirror, and it’s gone. The crease color has vanished, the liner has smudged or disappeared into a fold, and your eyelid seems to have shrunk to a fraction of its size. If this sounds painfully familiar, you likely have hooded eyes.
For too long, the beauty world has treated this incredibly common eye shape as a “problem” to be fixed. But hooded eyes are not a flaw; they are a beautiful canvas that simply requires a different artistic approach. The standard techniques taught in most tutorials are designed for a prominent, visible crease, which is why they so often fail on a hooded eye.
This is not just another list of tips. This is your definitive handbook. We will break down the unique anatomy of the hooded eye and provide you with the professional, game-changing techniques to define, enhance, and create a stunningly lifted look. It’s time to stop fighting against your eye shape and start working with it to unlock its full potential.
Part 1: Defining Hooded Eyes – Understanding Your Canvas
First, let’s be clear on what a hooded eye is. An eye is considered “hooded” when there is a fold of skin that droops down from the brow bone, partially or fully covering the mobile eyelid when the eye is open and relaxed. This can be a genetic feature you’ve had your whole life, or it can become more prominent with age as skin loses elasticity.
The Core Challenges for Makeup Application:
- The Disappearing Crease: Any eyeshadow applied in your natural, anatomical crease will be hidden by the hood when your eye is open.
- Limited Lid Space: The visible mobile lid is smaller, meaning thick eyeliner or dark colors can make the eye look closed off.
- Smudging & Transfer: The skin of the hood rests on the eyelid, causing eyeliner and mascara to transfer and smudge onto the brow bone.
These challenges are why the foundational techniques we outlined in our Beginner’s Guide to Eye Makeup must be adapted.
Part 2: The Golden Rule – Create a “Faux Crease” with Your Eyes Open
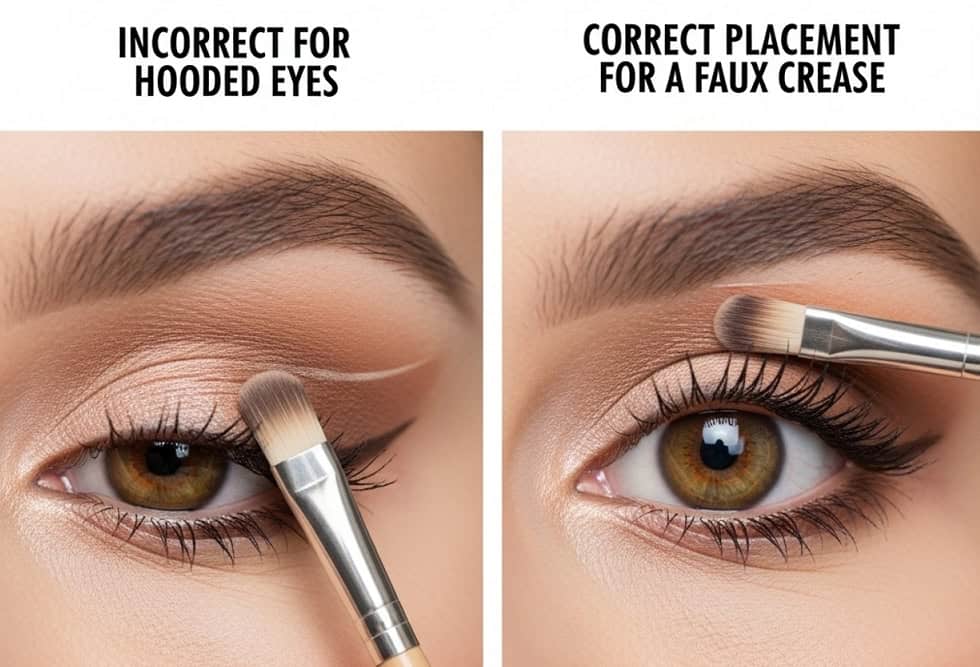
This is the single most important concept you will ever learn for hooded eye makeup. You cannot follow a tutorial that tells you to “apply shadow in your crease” by looking down. You must create the illusion of a crease where it will be visible.
The “Look Straight Ahead” Method:
- Sit in front of your mirror and relax your facial muscles. Look straight ahead.
- Identify your natural crease with a brush. Now, notice where the “hood” of your skin begins to fold over.
- Your “faux crease” is the area above your natural crease, right at the edge of the hood, that remains visible when your eye is open. This is where you will apply your crease and transition shades.
By placing your definition here, you are creating a shadow that recedes the hood and brings the visible part of your eye forward, creating depth and dimension that doesn’t disappear.
Part 3: The Step-by-Step Hooded Eye Tutorial
This tutorial is designed specifically to lift and define.
Step 1: The Non-Negotiable Prime
- The Why: For hooded eyes, primer isn’t just for longevity; it’s for smudge-proofing. It creates a barrier that prevents the oils from your lid and the hood from mixing, stopping mascara and eyeliner from transferring.
- The How: Apply a thin layer of a high-quality eyeshadow primer all over the lid and, crucially, extend it up over the hood, almost to your brow.
Step 2: The Faux Crease & Transition
- Product: A matte, neutral eyeshadow a few shades darker than your skin tone.
- The How: With your eyes open and looking straight ahead, use a fluffy blending brush to start applying the transition shade along your newly identified “faux crease” line. Use gentle windshield-wiper and circular motions to build the color. The key is to blend upwards and outwards towards the tail of your eyebrow. This upward motion creates a powerful visual lift.
Step 3: Deepen the Outer Corner
- Product: A deeper matte shadow (e.g., dark brown, deep plum).
- The How: With a smaller blending brush, concentrate this darker shade on the outer third of your faux crease, again blending upwards and outwards. This adds dimension and further enhances the lifted effect. Keep the darkest point at the outer edge.
Step 4: Maximize Your Lid Space
- Product: A light-reflecting eyeshadow (satin, shimmer, or a very light matte).
- The How: Use a flat shader brush or your fingertip to pat this light shade onto the visible part of your mobile lid. Bring the color up slightly higher than you think you need to, so that a sliver of it is still visible peeking out from under the hood when your eye is open. This technique makes the lid appear larger and brings it forward.
Step 5: Balance with the Lower Lash Line
- The Why: Applying makeup only on the top can make a hooded eye look top-heavy. Adding shadow to the lower lash line creates balance and makes the eye appear larger.
- The How: Take a small pencil brush and smudge your transition shade along the entire lower lash line. Then, take your deeper matte shade and concentrate it on the outer third of the lower lash line, connecting it to the shadow on your upper outer corner.
Part 4: The Eyeliner Conundrum – Relearning Your Liner
Thick, bold liner is the enemy of a hooded eye. It will consume all your precious visible lid space.
- DO: Tightline. This is your secret weapon. Use a waterproof pencil to line your upper waterline (the fleshy rim under your upper lashes). This adds incredible definition and the illusion of a thicker lash line without taking up any lid space.
- DON’T: Apply a Thick Line on the Lid. When your eye is open, this will look like a solid block of color and make your eye look smaller.
- DO: The “Bat Wing” or Smart Wing. For a winged look, the line must be drawn to look correct when your eye is open.
- Looking straight ahead, draw the flick outwards from your outer corner.
- Then, draw a straight line from the tip of the flick down to your lash line, creating a small, empty triangle.
- Fill in the triangle. When you close your eye, it will look like it has a “step” in it, but when you open your eye, it will look like a perfect, straight wing. For a full breakdown of different liner techniques, explore our Guide to Choosing and Applying Eyeliner.
- DO: Use Eyeshadow as Liner. A soft, smudged line created with a dark eyeshadow on an angled brush is often the most flattering and forgiving option.
Part 5: The Supporting Cast – Brows and Lashes Matter More Than Ever
- Brows Are Your Best Friend: A well-groomed, arched brow creates vertical space, visually lifting the entire eye area. Avoid heavy, straight, or downward-sloping brows. Focus on creating a clean arch and lifting the tail of the brow. For a full tutorial, see our guide on How to Get Fuller, Natural-Looking Brows.
- Lash Power:
- Curl, Curl, Curl: An eyelash curler is non-negotiable. Lifting your lashes straight up can help to “push back” the hood slightly and open up the eye.
- Waterproof or Tubing Mascara: To prevent smudging from your lashes touching the skin of your hood, a waterproof or tubing mascara is essential.
FAQ Section: Your Hooded Eye Questions, Answered

- 1. Can I still wear a dark, smoky eye?
- Absolutely! The principle is the same: you just have to bring the “smoke” up much higher. Blend your dark shadows up onto the hood so the smoky effect is visible when your eye is open. Think of it as a smoky “faux crease.”
- 2. Why does my mascara always smudge onto my brow bone?
- This is the classic hooded eye problem. Your long, curled lashes are touching the skin of your hood. The solution is to switch to a tubing mascara, which forms tiny water-resistant “tubes” around your lashes that won’t smudge with oil, or a high-quality waterproof mascara.
- 3. What are the best false lashes for hooded eyes?
- Avoid extremely thick, heavy lashes that can weigh down the eye. Look for styles that are shorter on the inner and outer corners and longest in the center. This creates a rounded, eye-opening effect. A half-lash placed on the outer corner can also create a beautiful lift.
- 4. Is a “cut crease” possible on hooded eyes?
- Yes, but it’s an advanced technique. You would be creating the entire “cut” on the hood itself, above your natural crease, to ensure it’s visible. It requires precision and practice, but the effect can be stunning.
Conclusion: Embrace and Enhance Your Unique Beauty
Makeup for hooded eyes is not about correction; it’s about celebration. By understanding the unique architecture of your eyes and swapping standard techniques for those designed to enhance your shape, you unlock a new world of creative possibilities. Embrace the “faux crease,” master the art of the smudge-proof liner, and learn to love the beautiful, captivating depth that is unique to your hooded eyes. With practice, these techniques will become second nature, empowering you to create a lifted, defined, and confident look every single time.

