


It’s the moment every makeup wearer dreads. You’ve expertly applied your concealer, your under-eyes look bright and flawless, and you feel ready to take on the day. But a few hours later, a glance in the mirror reveals the betrayal: your concealer has migrated, settling into every fine line and creating a map of tiny, textured creases that make you look more tired than when you started. Why does this happen, and is it even possible to stop it?
The answer is a resounding yes. Concealer creasing is not an inevitable fate you must accept. It’s a technical problem with a technical solution.
This is not another list of quick tips. This is a complete, step-by-step masterclass that will teach you the professional-grade system to achieve a truly smooth, bright, and crease-proof under-eye. We’ll delve into the reasons why creasing happens and provide you with the exact prep, application, and setting techniques to finally put an end to it for good.
Part 1: Understanding the Enemy – The Anatomy of Under-Eye Creasing
To defeat the problem, you must first understand its cause. The under-eye area is a unique and challenging canvas for three primary reasons:
- The Skin is Different: The skin here is the thinnest on your entire body. It has very few oil glands, making it naturally prone to dryness and dehydration. Dehydrated skin is less plump and has more visible surface texture, which makeup loves to cling to.
- It’s an Area of High Movement: We blink over 20,000 times a day. We smile, we squint, we express emotion. All this movement causes the skin to constantly fold and contract, naturally pushing liquid makeup into any available crease.
- Everyone Has Natural Folds: It’s crucial to distinguish between wrinkles and the skin’s natural folds. Everyone, regardless of age, has tiny lines under their eyes. The goal of a crease-proof technique is not to magically erase these lines, but to prevent the concealer from gathering and settling within them.
As we covered in our guide to 5 Common Concealer Mistakes, using the wrong product or technique in this delicate area is a recipe for a flawed finish.
Part 2: The Pro-Approved, 5-Step System for a Crease-Proof Finish
This is the core of the method. Follow these five steps in order, and you will see a dramatic difference in the wear and smoothness of your concealer.
Step 1: PREP – The Hydrated, Plump Canvas
You cannot expect a smooth result on a dry surface. Proper hydration is the non-negotiable first step.
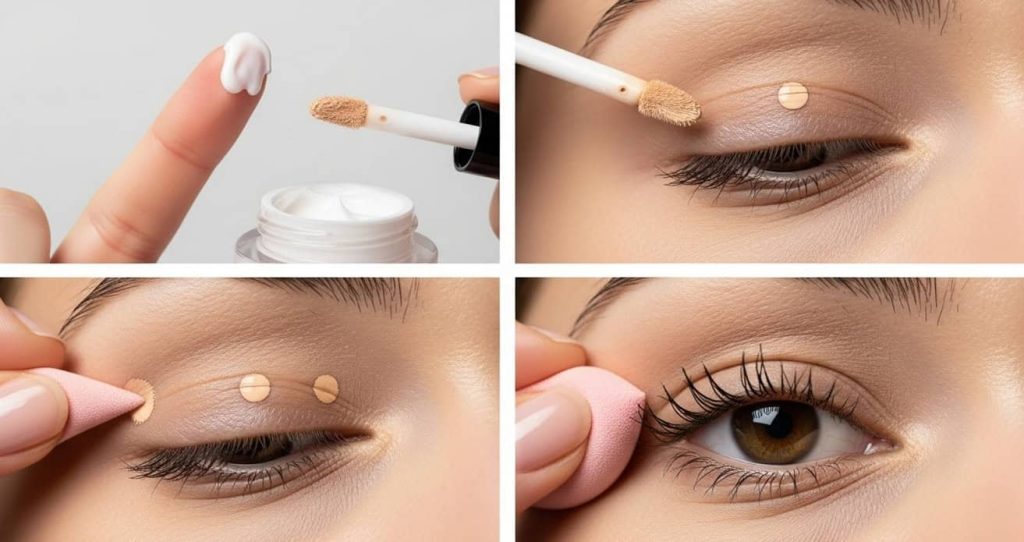
- Start with Eye Cream: Applying concealer to a dry under-eye is like trying to paint on sandpaper. You must use a dedicated eye cream.
- What to Look For: Choose a lightweight, hydrating formula with ingredients like Hyaluronic Acid (to attract water), Glycerin (to bind moisture), and Peptides (to plump).
- What to Avoid: Steer clear of extremely thick, rich, or greasy eye creams right before makeup. While great for nighttime, they can cause the concealer to slide around and break down.
- The Art of Application: Use your ring finger to gently tap a small, rice-grain-sized amount of eye cream onto the orbital bone. Avoid applying it too close to your lower lash line.
- The Golden Rule: Absorption Time: Give your eye cream at least 2-5 minutes to fully absorb before moving on to concealer. This creates a plump, hydrated surface rather than a slick, wet one. This simple pause is a critical detail we emphasize in our complete Guide to Skin Prep.
Step 2: APPLY – Less Product, Strategic Placement
The single biggest cause of creasing is simply using too much concealer.
- Use a Hydrating Formula: A thick, matte, drying concealer will always crease more than a flexible, hydrating, liquid formula. Choose a product that describes itself as “radiant,” “hydrating,” or “serum-like.”
- The “Less is More” Philosophy: Start with the absolute minimum amount of product needed. You can always add more.
- Master the Lifting Placement: As we detailed in our concealer mistakes guide, avoid the large triangle. Place one small dot in the dark inner corner and a tiny swipe angled up at the outer corner. This brightens and lifts with minimal product.
Step 3: BLEND – The Seamless Merge with Skin
How you blend is just as important as where you apply. The goal is to melt the product into the skin, not just smear it around on top.
- Your Tools:
- Damp Mini-Sponge: This is often the best tool. It presses the product into the skin and sheers it out for a natural, skin-like finish while absorbing any excess.
- Your Ring Finger: The warmth of your finger can help melt the concealer beautifully. Use a gentle tapping motion.
- A Fluffy Brush: A small, synthetic, fluffy brush can be used to buff the concealer out for an airbrushed effect.
- The Blending Motion: Use a gentle tapping or stippling motion. Never swipe or drag the concealer, as this creates streaks and removes coverage. Blend until there are no visible edges.
Step 4: THE CRITICAL PAUSE – Smooth the Canvas One Last Time
This is the single most important professional trick that most people skip.
- The Process: After you’ve fully blended your concealer, STOP. Let it sit for about 30-60 seconds. During this time, the product will naturally begin to settle into your fine lines due to your blinking and facial movements.
- The Final Smooth-Out: Now, take your damp sponge or your finger and, looking up into a mirror to stretch the skin taut, gently tap over the under-eye area one last time. This final pass will smooth out any product that has just begun to settle, creating a perfectly smooth canvas right before you set it.
Step 5: SET – The Lock and Key Technique
Now that your canvas is perfectly smooth, you must lock it in place immediately. This is not about baking; it’s about a strategic, lightweight setting.
- The Right Powder: This is crucial. You need an incredibly finely milled, lightweight translucent or brightening setting powder. Heavy, tinted face powders will look cakey and exacerbate creasing.
- The Right Tool: A powder puff (like a velour triangle puff) or your damp makeup sponge are superior to a brush for this task.
- The “Press and Roll” Method:
- Get a small amount of powder onto your puff or sponge.
- Tap off any excess powder on the back of your hand. You want a thin, even coating on your tool.
- Look up again to ensure the under-eye is smooth.
- Gently press the puff onto the under-eye area and roll it off. Do not swipe or buff. This pressing motion locks the still-smooth concealer in place without disturbing it, creating a crease-proof seal.
Part 3: Advanced Troubleshooting – When You Need Extra Help
- For Very Dark Circles – Color Correct First: If you have intense darkness, apply a thin layer of a peach or pink color corrector before your concealer. By neutralizing the darkness first, you’ll need significantly less concealer on top. Less product = less potential for creasing.
- For Very Dry or Mature Skin – The Primer & Oil Trick:
- Consider a hydrating under-eye primer applied after your eye cream.
- For a boost of hydration, mix a tiny pin-prick amount of a non-greasy facial oil (like squalane) into your concealer on the back of your hand before applying.
- The “Baking” Myth Debunked: Baking involves applying a very heavy layer of powder and letting it sit. While useful for stage makeup or extremely oily skin, this technique is a disaster for most under-eyes. It dehydrates the delicate skin, creating a dry, cracked, and aged appearance. Stick to the light “Press and Roll” method.
Pro Tip: The secret to a truly flawless finish as part of your base routine lies in blending and choosing the right formulas for your skin type.”
FAQ Section: Your Crease-Proof Questions, Answered

- 1. Should I put foundation under my eyes before concealer? It’s generally not recommended. This just adds another layer of product that can contribute to bulk and creasing. End your foundation application just at the top of your cheekbone and let your concealer do the work on the under-eye area itself.
- 2. My concealer still looks a little creased midday. How can I fix it on the go? This is an easy fix! Don’t add more product. Simply take your clean ring finger and gently tap over the creased area. The warmth of your finger will re-melt the product and smooth it out again.
- 3. What if I have very deep-set wrinkles? Will this method get rid of them? This method is designed to prevent product from settling in lines. It cannot erase the physical lines themselves. The goal for very textured skin is to use the least amount of product possible, focus on intense hydration, and accept that a completely smooth, line-free result isn’t realistic. The aim is significant improvement.
- 4. Is a special “under-eye primer” really necessary? It’s not essential, but it can help. A good under-eye primer can add an extra layer of hydration and create a smoother surface. However, a well-formulated eye cream that is allowed to absorb properly often does the job just as well.
Conclusion: A Flawless Finish is a Matter of Technique, Not Luck
The persistent problem of creased concealer is not a sign that you need a new product; it’s a sign that you need a new system. By embracing this professional, five-step method—meticulous prep, minimal application, seamless blending, the critical pause, and strategic setting—you are taking control. You are transforming your concealer application from a daily gamble into a reliable, repeatable skill. Say goodbye to midday mirror shocks and hello to a smooth, bright, and confidently crease-proof finish that lasts.

